Front End Regression Testing with Nightwatch.js and Nightwatch VRT
If you have to maintain a huge or quite complex CSS codebase, it is a big challenge to make sure you don’t break certain parts of the site when you try to fix an issue or just simply add a new component.
Do you want to keep track of how your code works on the current browser versions? Or you just want to do a refactor without causing any accidental regressions? Either way, in 2022, we have well-functioning, widely used visual regression testing tools at our disposal. In this post, I want to show you how we can use Nightwatch.js and Nightwatch VRT.
My motivation
Since I am interested in improving and optimizing the performance of websites in particular, I try to reduce the size of the CSS asset(s) as much as possible. In many cases, serious results can be achieved only by rearranging the order of the selectors. I thought since my CSS codebase is small enough, I can easily refactor it without causing any issues. And after a couple weeks, I noticed that paragraphs which contain a <sup> tag have very weird vertical rhythm:
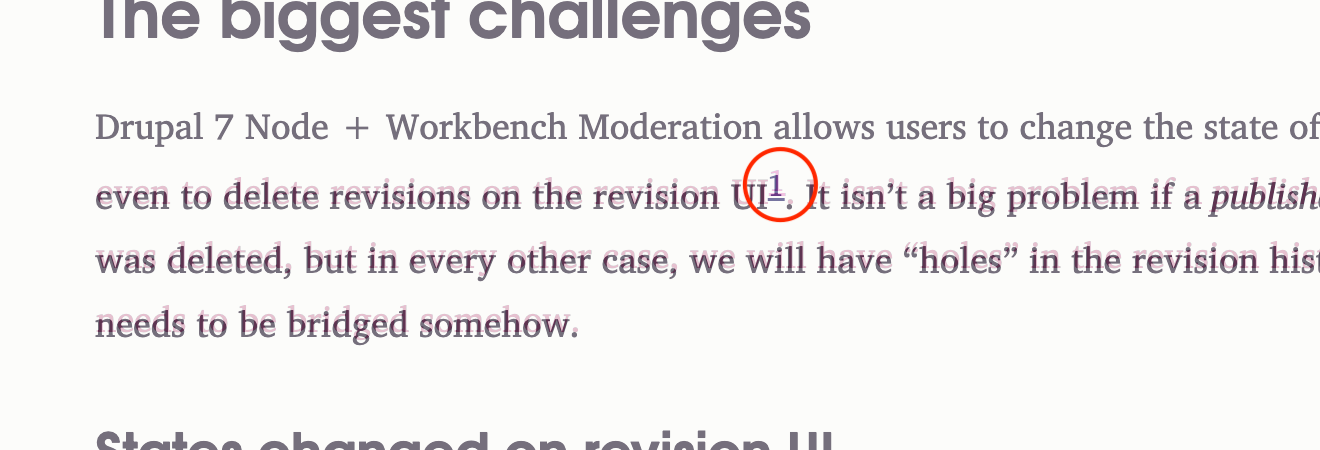
<sup> tag. The light purple “shadow” shows where words should be.
Well, this was the time I decided I will set up visual regression testing.
Basics, background
You may remember that I used Nightwatch.js tests about three and a half years ago in a quite similar situation. Well, Nightwatch VRT uses very similar Node.js modules and tools under the hood to perform visual regression tests1.
Essentially, Nightwatch VRT provides a Nightwatch.js command and a Nightwatch.js assertion. The way it works is very developer friendly: In your Nightwatch.js test, you can use the screenshotIdenticalToBaseline() assertion to compare the actual visual representation of an HTML element to a base image. If the base image does not exist – because you are executing the test for the first time, or you just added a new screenshotIdenticalToBaseline() assertion – then this assertion will generate the base image at the first execution.
Setup Nightwatch.js and Nightwatch VRT
-
Initialize the node.js part of your project (only necessary if it does not exist yet):
yarn init . -
Add Nightwatch.js and Nightwatch VRT as development dependencies:
yarn add --dev nightwatch-vrt nightwatch@1At the time I am writing this post, we have to use Nightwatch.js with
@1version constraint, because Nightwatch VRT needs this version. -
Add a
nightwatch.jsonfile to the root of the project then add the assertions and commands folder of Nightwatch VRT to this configuration. I used to copy this file fromnode_modules/nightwatch/examplesthen slightly customize it to match my needs. This is what I use:1 2 3 4 5 6 7 8 9 10 11 12 13 14 15 16 17 18 19 20 21 22 23 24 25 26 27 28 29 30 31 32 33 34 35 36
{ "src_folders" : "./tests/Nightwatch/tests", "output_folder" : "./tests/Nightwatch/reports", "custom_commands_path" : [ "./tests/Nightwatch/Commands", "./node_modules/nightwatch-vrt/commands" ], "custom_assertions_path": "./node_modules/nightwatch-vrt/assertions", "globals_path" : "./tests/Nightwatch/globals.js", "test_workers" : false, "webdriver" : { "server_path": "/usr/local/bin/chromedriver", "start_process": true }, "test_settings" : { "screenshots": { "enabled": true, "path": "./tests/Nightwatch/reports/screenshots", "on_failure": false, "on_error": false }, "default" : { "disable_colors": false, "screenshots" : { "enabled" : false, "path" : "" }, "request_timeout_options": { "timeout": 1000, "retry_attempts": 5 }, "desiredCapabilities" : {} }, "mobile" : {} } }
-
(Optional) Nightwatch VRT searches for its configuration either at Nightwatch
globals.test_settings.default.visual_regression_settingsor at Nightwatchglobals.visual_regression_settings. We have to create the file we specified at theglobals_pathconfiguration (line 9). We can define other pre- and post-test hooks here, or store the “default” landing page url like I do. But if we don’t specify anyvisual_regression_settingsconfig anywhere, then Nightwatch VRT will use its default configuration. If you think you don’t need this “globals” file, you can delete it, but don’t forget to remove theglobals_pathfrom yournightwatch.jsJSON.1 2 3 4 5 6 7 8 9 10 11 12
module.exports = { landingPageUrl: 'http://127.0.0.1:4000', beforeEach: function (browser, done) { browser.resizeWindow(1024, 600, done); }, visual_regression_settings: { "baseline_screenshots_path": 'tests/Nightwatch/vrt', "threshold": 0, "prompt": false, "always_save_diff_screenshot": false } };
-
(Optional) Since I can’t be sure that the path to the chromedriver binary is always
/usr/local/bin/chromedriver(see line 12 above), I also have anightwatch.conf.jsfile in my root which changes this path to the output of thewhich chromedrivercommand:1 2 3 4 5 6 7 8 9
const which = require('which'); module.exports = (settings => { const chromedriverPath = which.sync('chromedriver'); if (chromedriverPath) { settings.webdriver.server_path = chromedriverPath; } return settings; })(require('./nightwatch.json'));
In the config file above, inside test_settings, we have a default (line 22) and a mobile (line 34) key. These are the environments our tests can be executed on. The default environment is a special one: on one hand, if the environment isn’t specified, Nightwatch.js will use this environment. On the other hand, every other environment we specify (now it is mobile) will inherit the configuration of the default one.
Set up test browsers
I think using chromedriver as the (default) browser for executing Nightwatch.js tests on is the most obvious choice. This is what I know the best, for example I can configure it to act as a mobile browser (with touch-capable screen). So I chose Chrome and chromedriver. I added these configurations to my nightwatch.json:
1
2
3
4
5
6
7
8
9
10
11
12
13
14
15
16
17
18
19
20
21
22
23
24
25
26
27
28
29
30
31
32
33
34
35

{
  "src_folders" : "./tests/Nightwatch/tests",
  "output_folder" : "./tests/Nightwatch/reports",
  …
  "test_settings" : {
    …
    "default" : {
      …
      "desiredCapabilities" : {
        "browserName" : "chrome",
        "loggingPrefs": {"driver": "INFO", "server": "OFF", "browser": "INFO"},
        "chromeOptions" : {
          "args" : [
            "--headless",
            "--force-device-scale-factor=1",
            "--hide-scrollbars",
            "--font-render-hinting=full",
            "--enable-font-antialiasing",
            "--force-color-profile=srgb"
          ]
        }
      }
    },
    "mobile" : {
      "desiredCapabilities" : {
        "chromeOptions" : {
          "mobileEmulation": {
            "deviceMetrics": { "width": 360, "height": 640, "pixelRatio": 1.0 },
            "userAgent": "Mozilla/5.0 (Linux; Android 4.2.1; en-us; Nexus 5 Build/JOP40D) AppleWebKit/535.19 (KHTML, like Gecko) Chrome/18.0.1025.166 Mobile Safari/535.19"
          }
        }
      }
    }
  }
}
Writing the first visual regression test
In the configuration JSON, the "src_folders" : "./tests/Nightwatch/tests" line declares that our Nightwatch.js tests should be in that directory. Of course, we can execute tests which aren’t stored in this folder, but if we just run ./node_modules/.bin/nightwatch, only the tests in ./tests/Nightwatch/tests are discovered.
Make sure your chromedriver is compatible with the Chrome version you use, then create a simple test in the ./tests/Nightwatch/tests folder:
1
2
3
4
5
6
7
8
9

module.exports = {
  'HuZooka': function (client) {
    client
      .url('https://huzooka.github.io/')
      .waitForElementVisible('css', 'main .intro')
      .assert.screenshotIdenticalToBaseline('main .intro', 'HuZooka intro')
      .end();
  }
}
How it works
Nightwatch.js tests can be performed by executing this command on CLI:
./node_modules/.bin/nightwatch
For the first time, Nightwatch VRT will save a base image in the configured ./tests/Nightwatch/vrt folder, in a subdirectory that’s name is the same as the test name (by default), and the base image file’s name will be Huzooka intro.png.

./tests/Nightwatch/vrt/huzooka/Huzooka intro.png
If the base image exists, each subsequent test run will compare the base image with the actually taken image, and save a diff image file if the comparison fails: if I change my shortened name “Zoltán Horváth” to my full name, “Zoltán Attila Horváth”, then the test will fail:
FAILED: 1 assertions failed and  15 passed (5.626s)
_________________________________________________

TEST FAILURE:  1 assertions failed, 15 passed (6.693s)

 ✖ huzooka
 – HuZooka (5.626s)
   Visual regression test results for element <.page-content .intro> in 5000ms - expected "true" but got: "/Users/zoli/projects/github-blog/vrt/diff/huzooka/HuZooka intro.diff.png" (5021ms)
       at Object.HuZooka (/Users/zoli/projects/github-blog/tests/Nightwatch/tests/huzooka.js:15:15)
       at processTicksAndRejections (internal/process/task_queues.js:97:5)

error Command failed with exit code 5.
With the default Nightwatch VRT configuration, a failed visual regression test also saves a “latest” and a “diff” image. These will be very helpful if the test fails on a remote environment (like a CI server), because then we can see the differences visually too.

./vrt/diff/huzooka/Huzooka intro.diff.png
My testing approach
My visual regression test cases are very basic:
- I am testing the header and the beginning of a “lorem ipsum” post.
- Then the footer and the end of the same “lorem ipsum” post.
- I have an “element” test which covers standard post elements, such as:
- an HTML
<p>tag containing sort sentences with some emphasized, bold, striked words - HTML blockquotes
- Ordered and unordered lists
- Inline
<code>tags and code blocks etc.
- an HTML
- And I also have a test which checks the spacing between elements frequently used in my posts:
- Spacing between
<p>and<p>tags, - Spacing between
<p>tags and code blocks etc.
- Spacing between
I have some posts and pages for these tests I don’t delete before I create the build artifact that is published - so if you’re curious and lucky2 at the same time, you can check them if you navigate to the public repository of this site and look for HTML files that’s name starts with VRT-.
Profit
As you can see, we can get an evaluable amount of test coverage by a small amount of code very quickly. Although the solution I described here only uses chromedriver, it could be a quite solid base if you want to extend it with cross-browser testing. And if you think so, you also can improve the component tests by using Storybook.
Footnotes:
-
It uses Jimp for capturing the elements based on the provided CSS selector. However, unlike me, they also worked on neatly tidying up the code and documenting it. Many thanks! ↩
-
I used to change my mind sometimes, so it can happen that at the time you read this post the visual regression test pages aren’t available anymore. I’m sorry about that! ↩